RS transparentthe official blog of the Percussive Arts Society

  • What I Wish Had Known Earlier, Part 8: Suspended Cymbal by Alex Fragiskatos

    by Rhythm Scene Staff | Jan 24, 2020

    As discussed in my previous article, in early music education, “weaker” percussionists often get placed on cymbal parts. This breeds the idea that cymbals are easy to play and may perpetuate the notion that these parts are less important. To the contrary, cymbals are a beautiful color instrument in percussion, a highly exposed instrument in the section, and serve to enhance any ensemble if played properly. To truly get the best sound possible, careful thought must be given to a variety of elements. In this article we will take a look at the suspended cymbal.

    Our first consideration needs to be equipment. There are as many opinions on cymbal selection as there are styles (German, Viennese, French, etc.) and sizes. While the art of cymbal selection is beyond the scope of this article, it does merit a brief discussion. Important cymbals to avoid using, unless otherwise asked for by the composer, are hi-hat cymbals, ride cymbals, and splash cymbals. Hi-hat cymbals are on the small side and, along with ride cymbals, are too thick to get a characteristic suspended cymbal sound. Splash cymbals are too small and too thin. Cymbals are quite expensive, and sometimes schools do not own specific cymbals marketed as “suspended cymbals.” Drum set crash cymbals can be suitable alternatives. Generally, these should be on the larger side (16–20 inches) for the best sound. 

    Cymbals should be mounted on either a straight cymbal stand or gooseneck stand. The latter is used to hang a cymbal that has a strap (like a handheld crash cymbal). It is also the preferred way to suspend a cymbal, as it is least restrictive; the cymbal can freely vibrate when not tightened to a stand. If mounted on a cymbal stand, make sure there is a plastic sleeve and felts above and below the cymbal to avoid metal-on-metal contact and buzzing. Do not tighten the wingnut too much, as this can choke the cymbal and cut off its natural resonance.
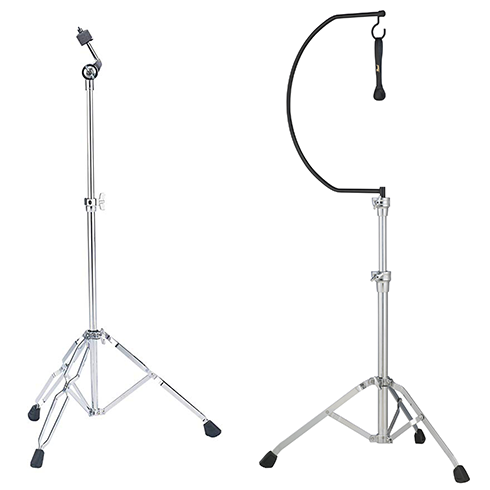
    Cymbal Stands

    Many types of implements can be used to strike the cymbal, the most common of which is a soft mallet. Sometimes composers may ask for a timpani mallet when they are thinking of a softer mallet; however, a timpani mallet is generally too light; when rolling or crashing, too much of the core will be heard. Ideally, a heavy yarn mallet should be used, as this will disguise the individual strokes when rolling and avoid an abrasive attack when crashing. If a composer asks specifically for a drumstick to achieve a more percussive attack, generally, a thicker drumstick is best for this.

    There are two main types of sounds on the suspended cymbal: crash and roll. Especially for a crash, “warm up” the cymbal by lightly tapping on the cymbal either with the mallet or your finger to activate its natural vibration. Strike near the edge of the cymbal, not too close to the center. Let the weight of the heavy yarn mallet do most of the work. A slow, even, and relaxed stroke will bring out the best sound. If a drumstick is called for, turn the stick around or use the shoulder of the stick. The stick tip should only be used if instructed since it is more characteristic of a drum set ride cymbal sound. Strike the cymbal on the top, but near the edge. Unlike in drum set playing in which the stick comes at an angle, the concert crash should be struck with a stick that is more parallel with the cymbal.


    For suspended cymbal rolls, mallets should be spread out, but across from each other, to activate the most resonant sound. Strokes should be relaxed and even to get the best sounding sustain. Softer dynamics require a slower roll speed, while louder dynamics require a faster roll speed. This is especially important for crescendos as the roll speed should gradually increase. In general, suspended cymbal roll crescendos sound best when the crescendo is delayed and grows more quickly at the end. It is important to use your ears, as you do not want the cymbal to wash out the ensemble by rolling too loudly too early.


    A final consideration is dampening. Pay attention to the marked duration of the note, and if there is a let ring/vibrate marking (a small tie to nothing or l.v.). To dampen, simply clasp the cymbal with one or both hands. When the cymbal must be dampened quickly, keep the shaft of the stick from hitting the cymbal and making extraneous noise. Sometimes composers and/or arrangers do not accurately notate note duration or how long the cymbal should ring. Always use your ears to listen to the ensemble to see what makes most sense. Context will provide all the clues you need to make an educated decision.

    Dr. Alexandros FragiskatosDr. Alexandros Fragiskatos is Assistant Professor of Instrumental Music at Missouri Valley College. A proponent of contemporary music, he has commissioned, premiered, and performed new works across the U.S. and Europe. Alex also plays percussion and drum set for musical theatre, as well as steel pan, having directed the Arizona State University Pan Devils Steel Band while earning his Doctor of Musical Arts degree in percussion. For more information about Alex, visit fragiskatospercussion.com.

  • What I Wish I Had Known Earlier, Part 7: Crash Cymbals by Alex Fragiskatos

    by Rhythm Scene Staff | Dec 01, 2019


    I remember back in eighth grade when it came time for my high school marching band audition; it was one of the most frustrating experiences because I could not properly execute an open roll. Granted, up to that point, I was not fortunate enough to have had private instruction on percussion. Consequently, I got “stuck” on cymbals, because that is where the weak players get placed, right? Unfortunately, there seems to be this accepted caste system in marching percussion in which cymbals get placed at the bottom; this often carries into concert percussion as well. Little did I know back in eighth grade, cymbals are one of the most difficult percussion instruments to play well. Over the next two articles, we will discuss basic ways to produce quality sounds, first, on crash cymbals and then suspended cymbal.

    Before crashing cymbals, we must consider the stance. Cymbal playing can be a very physical activity, therefore it requires a very stable stance. The foot opposite to your dominant hand should be slightly in front of the other, with both feet slightly wider than shoulder width apart. Knees should be slightly bent and your body weight placed squarely on both legs.

    Now that we have a suitable stance, we can discuss grip. Unlike in marching band, you do not need to put your hands through the straps. Hold each cymbal by the strap between the thumb and the side of the index finger, like a snare drum grip. The grip should not be too far from the cymbal itself, or else the cymbal will flop around due to instability. However, if the grip is too close to the cymbal, it will choke the sustain of the cymbal. Ideally, there should be approximately a half-inch of space between your grip and the cymbal.

    There are many valid ways to crash cymbals. The following is just one way to achieve a quality beginner concert crash. The goal is to reduce as many variables as possible that could have a negative impact. To start, hold the cymbals such that your hands are slightly below the chest and make sure both cymbals are perpendicular to the ground. The cymbal in the nondominant hand should remain stationary. The cymbal in the dominant hand will do most of the work, moving counterclockwise, in an upside-down teardrop shape. A good idea is to practice this without cymbals to familiarize oneself with the motion.

    Cymbal Grip

    When crashing, avoid bringing all the edges completely together, as this will create an air pocket. The crashing cymbal should make contact slightly above or below the stationary cymbal. Only as crashes get louder (f and above) will the nondominant hand come into play. For these, it should move in the opposite direction of the dominant hand. No matter the type of crash, keep your arms relaxed, and let the weight of the cymbal do most of the work. Dynamics should be a result of velocity, not so much distance between the cymbals; softer crashes call for a slower stroke while louder crashes call for a faster stroke.

    Dampening is also an important aspect of crash cymbal playing. Pay attention to the marked duration of the note, articulation, and if there is a let ring/vibrate marking (a small tie to nothing or l.v.). Let the cymbal ring for the duration of the note or let it ring longer if indicated. To dampen, simply bring the cymbals to your chest to cut off the sound. This is crucial for staccato notes and ensemble cutoffs. Sometimes composers and/or arrangers do not accurately notate duration or how long the cymbals should ring. For instance, sometimes in a march the cymbal part might be notated as alternating quarter notes and quarter rests, but it would not make sense to dampen between each crash. Always use your ears to listen to the ensemble to determine what makes the most sense. Context will provide all the clues you need to make an educated decision.

    Some final considerations include “warming up” the cymbals and where to put them. If there is time, it is ideal to warm up the cymbals by lightly tapping them on your knees. Cymbals, after all, are metal discs. Activating the metal’s natural vibration before crashing them will help elicit the best possible sound so the crash does not sound “cold.” Lastly, make sure the cymbals are either kept on a crash cymbal stand or trap tray—somewhere where they can easily and silently be set down and picked up.

    Dr. Alexandros FragiskatosDr. Alexandros Fragiskatos
    is Assistant Professor of Instrumental Music at Missouri Valley College. A proponent of contemporary music, he has commissioned, premiered, and performed new works across the U.S. and Europe. Alex also plays percussion and drum set for musical theatre, as well as steel pan, having directed the Arizona State University Pan Devils Steel Band while earning his Doctor of Musical Arts degree in percussion. For more information about Alex, visit fragiskatospercussion.com. 

  • What I Wish I Had Known Earlier, Part 6B: Tambourine by Alex Fragiskatos

    by Rhythm Scene Staff | Oct 01, 2019


    The tambourine is another instrument for which basic technique often eludes young percussionists. There are many ways to properly to play the instrument, but just as many ways, or more, to play it poorly. As with most of percussion, context determines the most appropriate approach. Part A (August 2019) introduced various ways to play the tambourine, from soft and loud at slow to moderate tempi, to loud at fast tempi. In part B, we will primarily explore ways to play softly and quickly, and to execute proper tambourine rolls.

    Resting the tambourine on the knee will achieve a softer, more delicate sound, as compared to holding it in the air. This is because some of the natural vibrations will be dampened, and thus the sound will be a bit more muted or staccato. This technique is ideal for very soft playing that calls for quicker rhythms, because minimizing the jingle sound will provide for more rhythmic definition and integrity.

    To execute, rest a foot on a low chair or stool, just as you would to play fist-knee tambourine. With the head facing up, rest a small part of the bottom rim of the instrument on the knee. The tambourine will be angled downward, away from the body to the right or left, with your nondominant hand up in the air. Play the instrument as you would with it held in the air, with your fingertip(s).

    As with loud playing, sometimes soft playing is required during passages that are too fast for one hand to execute. In this case, rest your foot on a stool or chair, and place the whole tambourine right-side up on your thigh. The more parallel the thigh is to the ground, the more stability you will find. The tambourine can either be wedged between your gut and thigh or stabilized by resting your forearms on top the instrument. Both ways will help create a drier sound. To play, simply pivot the wrists, and strike with your fingertip(s), just as people might nervously tap on a table on which their hands rest.

    Often a composer will call for a tambourine roll. The two primary ways in which we create this appearance of sustain is by a shake roll or finger roll. The shake roll is ideal for louder volumes and can be executed by holding the tambourine vertically in the air, with the hand underneath. The shaking motion is akin to twisting a doorknob back and forth if the doorknob were above you. However, the motion should be very rapid and short, with the arm and wrist relaxed. The idea is to mask, as much as possible, each shake, just as we strive to do when masking individual strokes for closed snare drum rolls. For clean beginnings and endings of rolls, you can start and end them with attacks from the fingers or fist of the playing hand.


    Finger rolls, or thumb rolls, are ideal for softer passages. These can be executed either using the middle finger with the thumb supporting underneath the middle finger’s first knuckle, or the thumb supported between the index finger’s first two knuckles in a closed fist. Lightly push the fingertip away from the body, along the rim of the tambourine—emphasis on “lightly,” as you don’t want to overpower the tambourine head’s resistance. The opposing forces created by the fingertip and tambourine head will produce a rapid tremolo. Moistening the fingertip either by licking or breathing warm air will help. Alternatively, a light coating of beeswax or rosin along the rim of the tambourine head can make it even easier. Finger rolls can be done both with the tambourine being held in the air or resting on the knee or thigh.


    Here we have explored some ways to play softly and quickly, and to execute proper tambourine rolls. Between this article and the previous one, you have what you need to excel in almost any tambourine situation. It is important to note, though, that these are just some of the ways to execute different types of passages on tambourine. There are a myriad of valid alternatives and variations which you might find more comfortable and successful. If you have little to no formal training on the tambourine, start with what I have suggested, but please, continue exploring!

    Dr. Alexandros FragiskatosDr. Alexandros Fragiskatos is Assistant Professor of Instrumental Music at Missouri Valley College. A proponent of contemporary music, he has commissioned, premiered, and performed new works across the U.S. and Europe. Alex also plays percussion and drum set for musical theatre, as well as steel pan, having directed the Arizona State University Pan Devils Steel Band while earning his Doctor of Musical Arts degree in percussion. For more information about Alex, visit fragiskatospercussion.com. 

Contact Us

Percussive Arts Society
127 E. Michigan Street Suite 600
Indianapolis, IN 46204
T: (317) 974-4488
F: (317) 974-4499
E: percarts@pas.org